> ## Documentation Index
> Fetch the complete documentation index at: https://help.draftable.com/llms.txt
> Use this file to discover all available pages before exploring further.
# Guide for iManage Cloud integration with Draftable Legal
> Draftable Legal allows you to integrate your iManage Cloud solution with Draftable Legal itself. This article will provide a step-by-step guide on how to set up this integration by first configuring Draftable Legal for iManage, and then completing the iManage-specific integration in control center. Additionally, there is information for Draftable Legal configuration in conjunction with group policy.
**The settings menu was reorganised in Draftable Legal 26.6.** If you are on 26.6 or later, follow the "26.6 and later" tabs below. On earlier versions, follow "Before 26.6". To check your version, open Settings. The version number shows at the bottom-left (for example, v26.6.0).
**Please note:** This is a technical integration guide written for administrator-level users. This is **not a guide** for **using iManage with Draftable Legal,** if you are looking for information on how to use iManage with Draftable Legal, please [visit this article instead](/hc/en-us/articles/16549583625241-iManage-Integration-with-Draftable-Legal).
**Video Resource:** For a comprehensive understanding of iManage deployment via cloud, we offer our specially crafted explainer video, accessible [via this link.](/hc/en-us/articles/27926349740825-iManage-Cloud-Integration-with-Draftable-Legal)
### Note regarding Machine Wide MSI installation for Draftable Legal and iManage integration
It is recommended that if are planning to use the Machine Wide MSI installer for your Draftable Legal installation, we highly recommend that you use the default install location if you also plan to integrate with iManage to reduce the likelihood of any issues during the integration process.
## Configure Draftable Legal within iManage Cloud Control Center
There are two distinct steps for Draftable iManage configuration, first we need to setup the integration within iManage itself (Control Centre), and then we need to set up the Draftable application configuration to log us into iManage.
### Configuring iManage Cloud
1. We need to first complete a few steps in order to correctly integrate Draftable Legal in iManage, and also setup the context menus to allow your users to compare with Draftable within iManage cloud.
**PLEASE READ AND FOLLOW THESE STEPS CAREFULLY**
Login into iManage and navigate to **control center.**
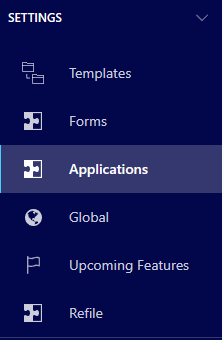
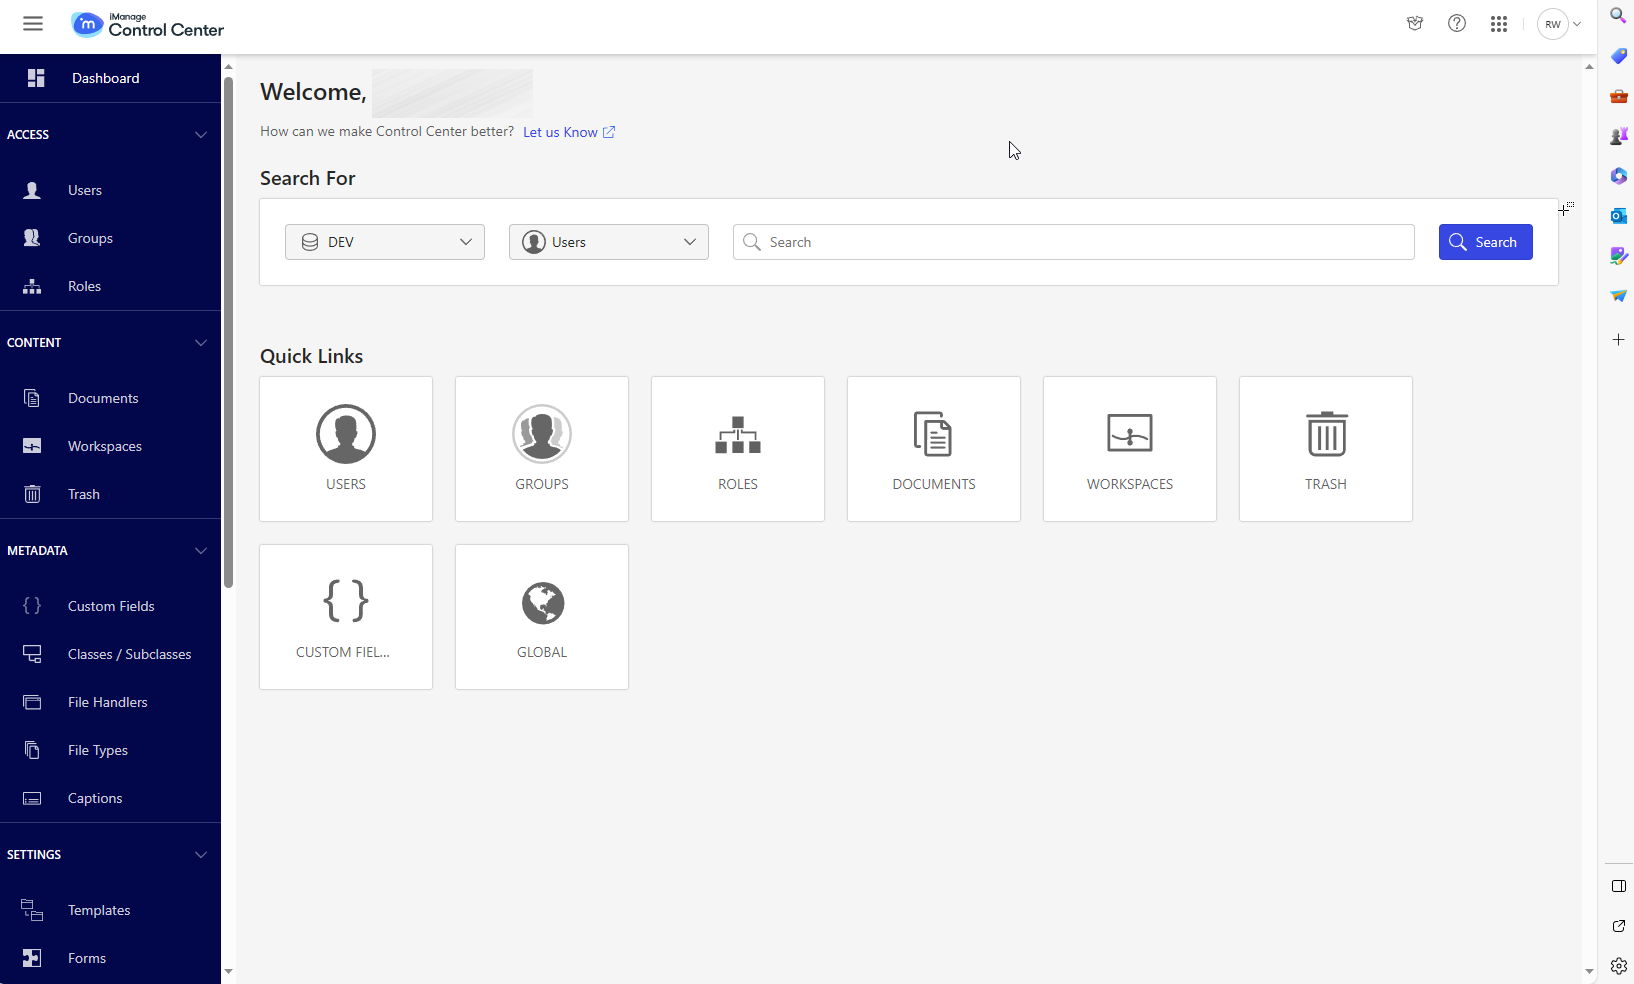 On the left hand menu bar, scroll until you see **settings,** then select **applications**
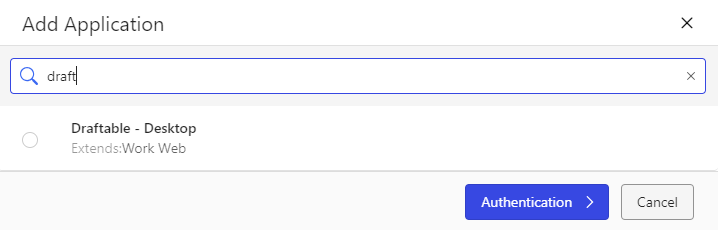
 On the top right-hand side, select **Add Application**
 Search for **Draftable**, select the **Draftable** option, and then click **Authentication**
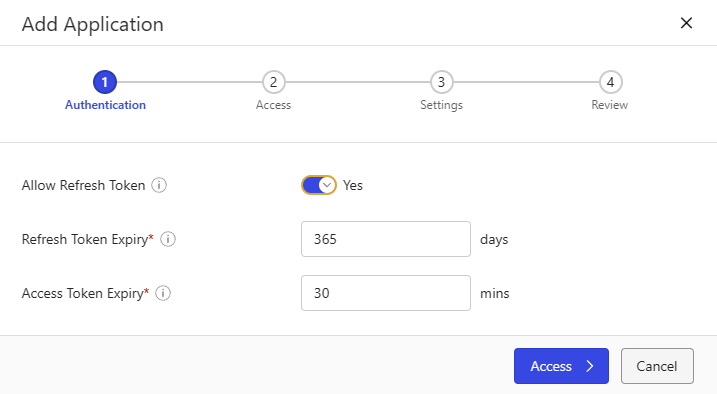
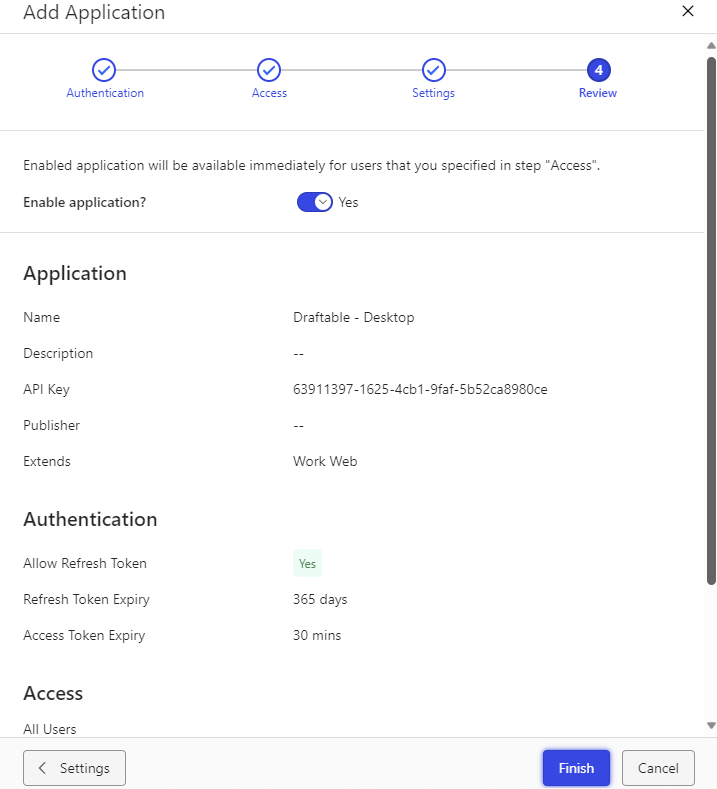
 Now we configure the application, in the authentication section, ensure we have the following settings configured:
**Allow Refresh Token = Yes - (PLEASE ENSURE YOU SELECT THIS AS 'YES')\
Refresh Token Expiry = 365\
Access Token Expiry = 30**
Once configured, select **Access.**
Now we configure the application, in the authentication section, ensure we have the following settings configured:
**Allow Refresh Token = Yes - (PLEASE ENSURE YOU SELECT THIS AS 'YES')\
Refresh Token Expiry = 365\
Access Token Expiry = 30**
Once configured, select **Access.**
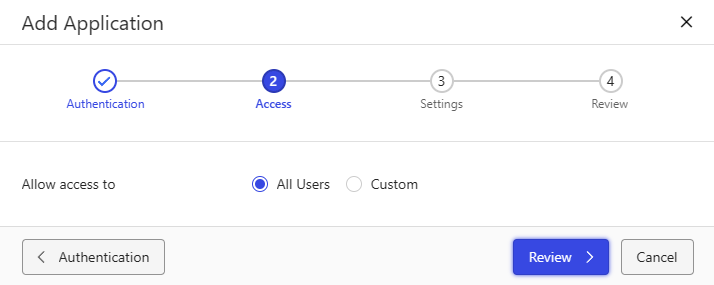
 In the "Access" window, ensure that **Allow access to** is set to **All Users.** Then click **Review.**
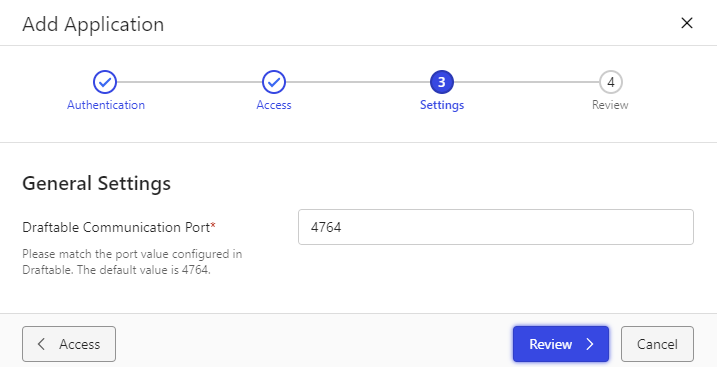
 In the "Settings" window, ensure that the **Draftable Communication Port** is set to **4764.** Then click **Review.**
**Note:** You can set this to a different value; however, this will require you to change the value on the client end as well via group policy. If you wish to change the port value, set it here within iManage to your desired value and also set the group policy for the Draftable communication port. For the group policy information, please refer to [this article.](/hc/en-us/articles/18763487262105-Configuring-settings-with-Group-Policy-Draftable-Legal)
In the "Settings" window, ensure that the **Draftable Communication Port** is set to **4764.** Then click **Review.**
**Note:** You can set this to a different value; however, this will require you to change the value on the client end as well via group policy. If you wish to change the port value, set it here within iManage to your desired value and also set the group policy for the Draftable communication port. For the group policy information, please refer to [this article.](/hc/en-us/articles/18763487262105-Configuring-settings-with-Group-Policy-Draftable-Legal)
 In the "Review" window, ensure that the information configured is correct, and then select **Finish.**
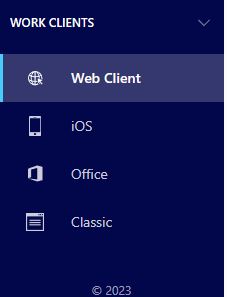
 Now that the application is configured, we need to set up the web client context menus. In the left-hand menu bar, scroll until you see **Work Clients,** then select **Web Client.**
 Within the web client section, select the **context menus** option to start editing the context menus.
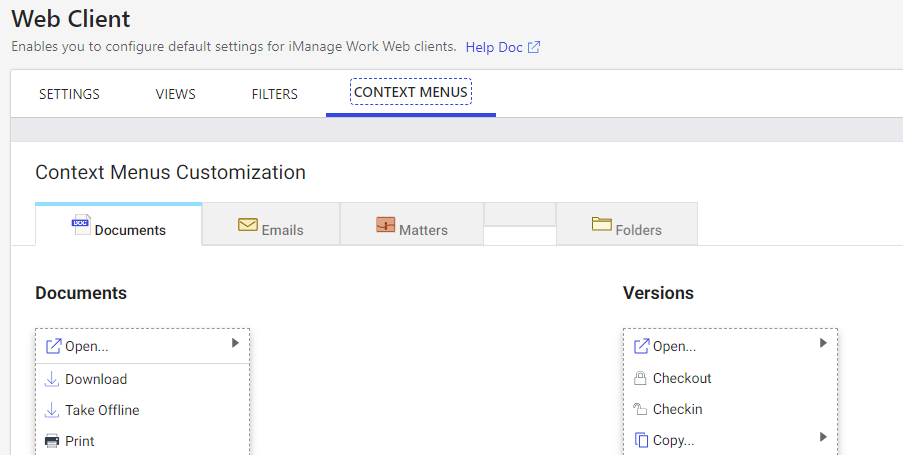 You will see two context menus, one for **Documents** and another for **Versions.** We need to edit both in order to correctly configure. We will first configure **Documents.**
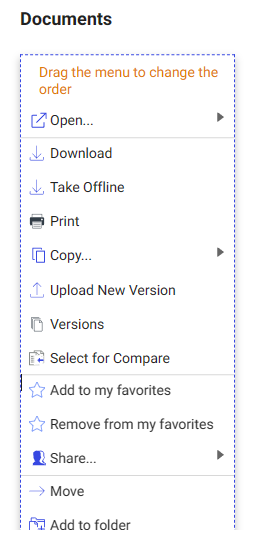 We first need to remove any options for **Select for Compare**, by clicking the X next to it. Do so before continuing to the next step.
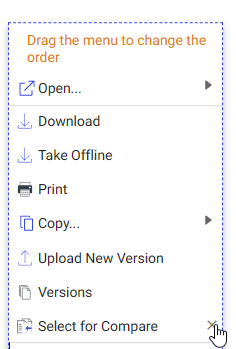 Now click on the menu itself so it highlights, and at the bottom of the menu select **Add action.**
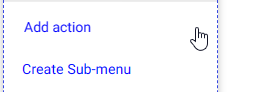 Select the **Compare** menu item, to add it to the menu. Repeat this for **Compare Versions, 1-Click Compare** and **Compare with latest** items as well.
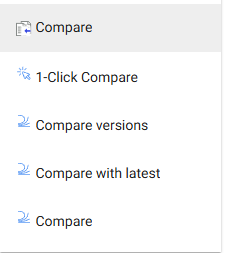 Reorder the new menu option by selecting and dragging the **Compare** options to anywhere in your menu. See below for reference.
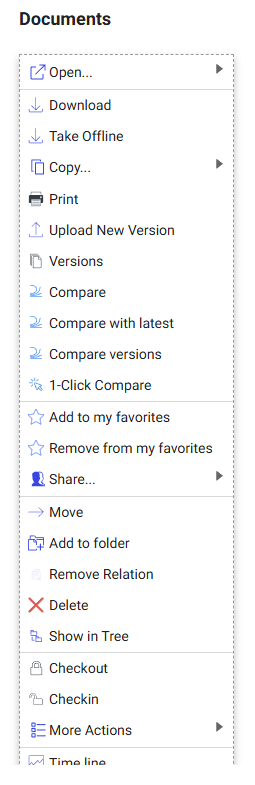 That completes the context menu for the **Documents** context menu. Repeat steps 11 to 15 for the version's context menu. You should see a result similar to below.
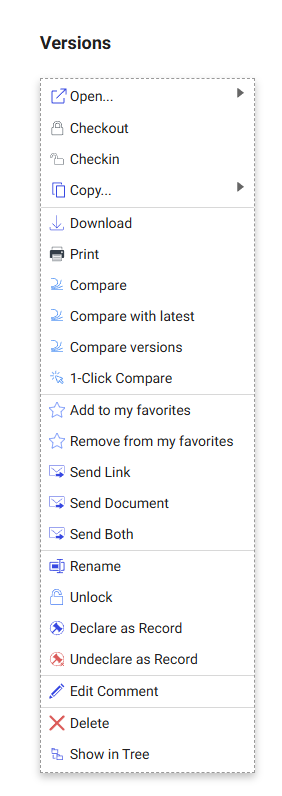 This completes the configuration for the setup for iManage on cloud. If you want to know how to use the feature itself, of launching Draftable from within iManage, please see [this article.](/hc/en-us/articles/22873285776409-Launching-comparisons-from-within-iManage)
### Configuring Draftable Legal
Now we need to ensure that we are logging into our cloud iManage account. In 26.6 and later, open the settings menu and go to **DMS Connections > iManage**. In versions before 26.6, navigate to the **Integrations** section of the settings menu and select **iManage**.
Depending on what version of Draftable you are using, there are two different procedures you need to follow depending on the version.
### If you are using Draftable v25.9.300 or earlier:
Now we need to ensure that we are logging into our cloud iManage account. Navigate to the **Integrations** section of the settings menu and select **cloud.**
Ensure you have logged into iManage on your Draftable Legal application. This can be done following the process below.
Open the settings menu and navigate to the **integrations** section of the settings.
This completes the configuration for the setup for iManage on cloud. If you want to know how to use the feature itself, of launching Draftable from within iManage, please see [this article.](/hc/en-us/articles/22873285776409-Launching-comparisons-from-within-iManage)
### Configuring Draftable Legal
Now we need to ensure that we are logging into our cloud iManage account. In 26.6 and later, open the settings menu and go to **DMS Connections > iManage**. In versions before 26.6, navigate to the **Integrations** section of the settings menu and select **iManage**.
Depending on what version of Draftable you are using, there are two different procedures you need to follow depending on the version.
### If you are using Draftable v25.9.300 or earlier:
Now we need to ensure that we are logging into our cloud iManage account. Navigate to the **Integrations** section of the settings menu and select **cloud.**
Ensure you have logged into iManage on your Draftable Legal application. This can be done following the process below.
Open the settings menu and navigate to the **integrations** section of the settings.
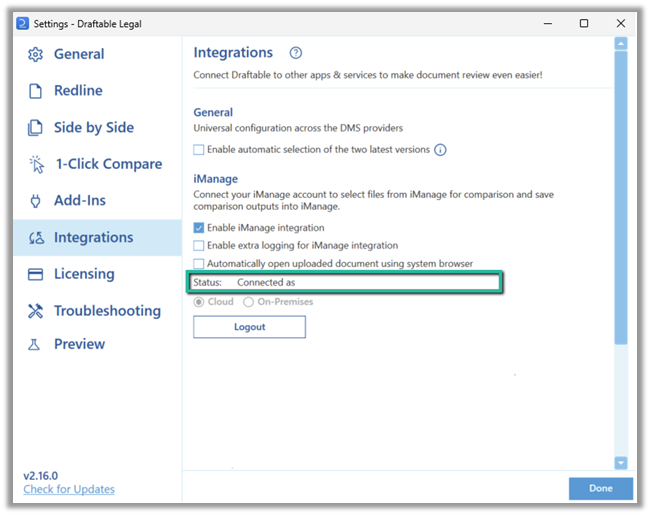
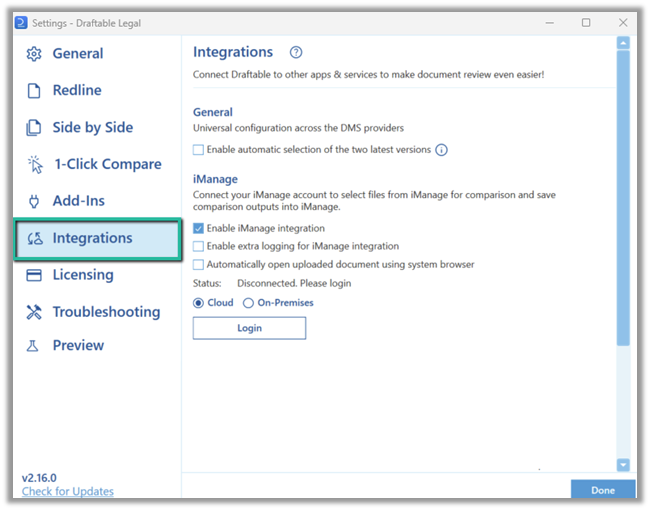 Click the **Login** button, and enter your credentials for your iManage account. It should display as *Connected as* with your correct account details if done correctly.
 That concludes the iManage configuration process between Draftable Legal and cloud iManage.
### If you are using Draftable v25.10.000 or later
Before you can connect, you need to turn on the iManage integration. In the settings menu, select **DMS Connections**, find the **iManage** section, and switch on its enable toggle. The connection options and **Servers** list only appear once iManage is enabled.
That concludes the iManage configuration process between Draftable Legal and cloud iManage.
### If you are using Draftable v25.10.000 or later
Before you can connect, you need to turn on the iManage integration. In the settings menu, select **DMS Connections**, find the **iManage** section, and switch on its enable toggle. The connection options and **Servers** list only appear once iManage is enabled.
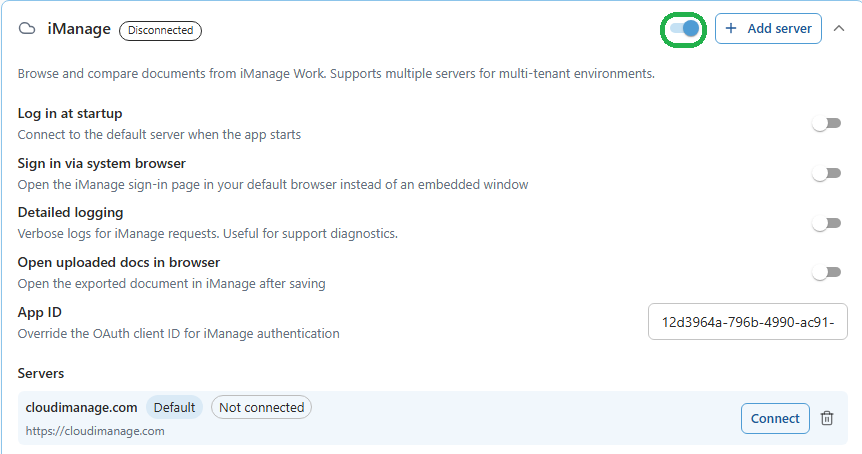 Open the settings menu, select **DMS Connections**, then expand the **iManage** section.
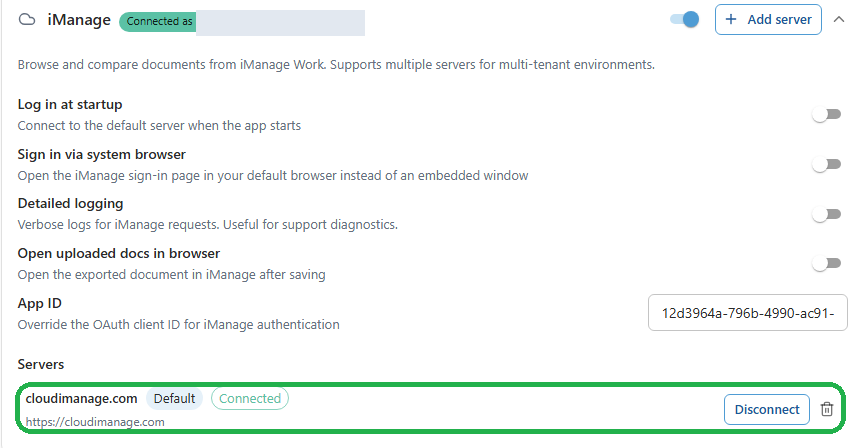
Here you can manage your connection options, including **Log in at startup**, **Sign in via system browser**, **Detailed logging**, **Open uploaded docs in browser**, and **App ID**. Your iManage servers are listed at the bottom under **Servers**.
Open the settings menu, select **DMS Connections**, then expand the **iManage** section.
Here you can manage your connection options, including **Log in at startup**, **Sign in via system browser**, **Detailed logging**, **Open uploaded docs in browser**, and **App ID**. Your iManage servers are listed at the bottom under **Servers**.
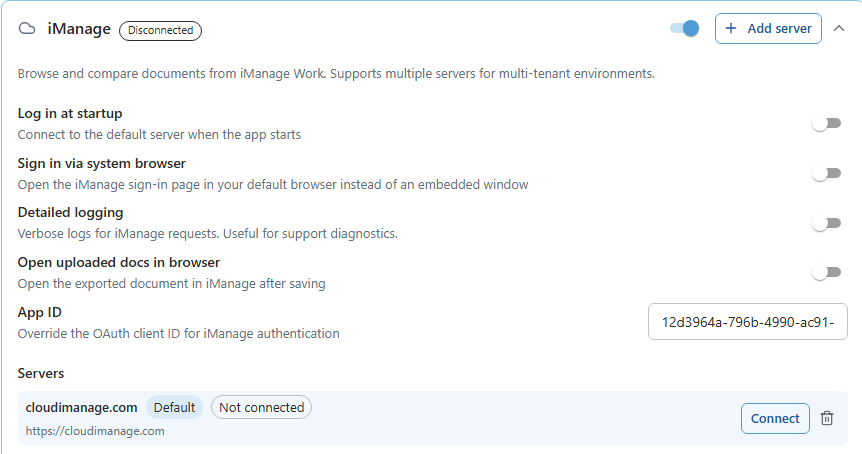 To add a server, click **Add server**. In the **Add iManage Server** dialog, enter your iManage Work server address in the **Server URL** field (for example, `https://cloudimanage.com`), then click **Add Server**.
In 26.6 and later the dialog has a single **Server URL** field. There is no separate name field; the server name is taken from the URL. You connect and authenticate after the server has been added.
To add a server, click **Add server**. In the **Add iManage Server** dialog, enter your iManage Work server address in the **Server URL** field (for example, `https://cloudimanage.com`), then click **Add Server**.
In 26.6 and later the dialog has a single **Server URL** field. There is no separate name field; the server name is taken from the URL. You connect and authenticate after the server has been added.
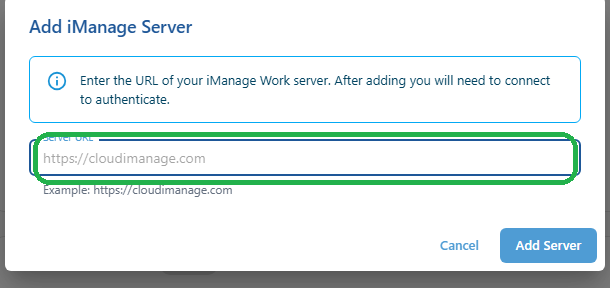 The server is added to the **Servers** list. You can add more than one server if you work across multiple tenancies.
 Find the server you want to use in the **Servers** list and click **Connect**, then enter your iManage credentials (unless they have already been configured by Group Policy).
 Once authentication succeeds, the connection is validated: the iManage header shows a green **Connected as** badge with your account, the server is marked **Connected** in the **Servers** list, and its **Connect** button changes to **Disconnect**.
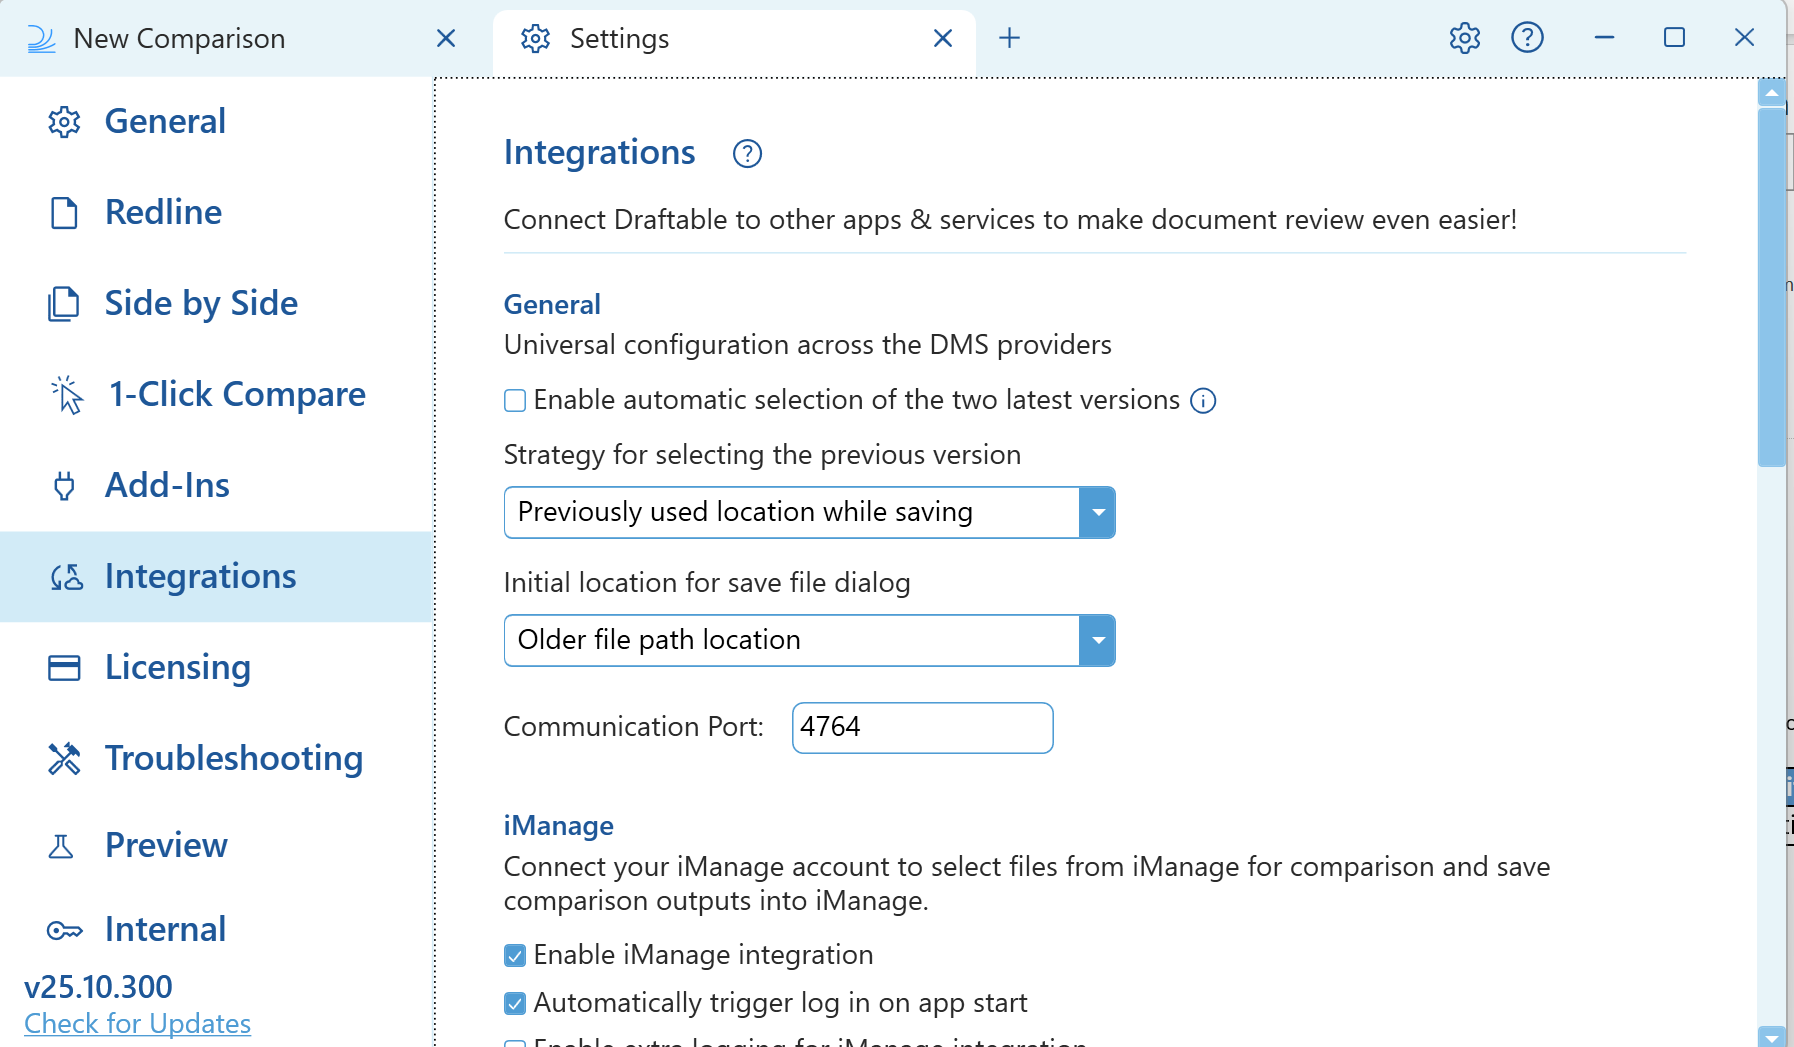
 Open the settings menu and navigate to the **Integrations** section of the settings.
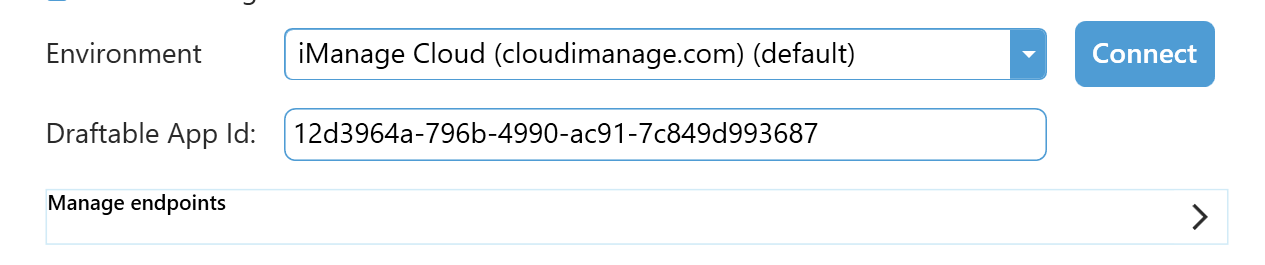
 Enter your credentials for your iManage account (if they haven't already been configured by Group Policy) by clicking the arrow in the "Manage endpoints" section.
 You can enter the endpoint name and the endpoint URL. This is important if you are using multiple tenancies.
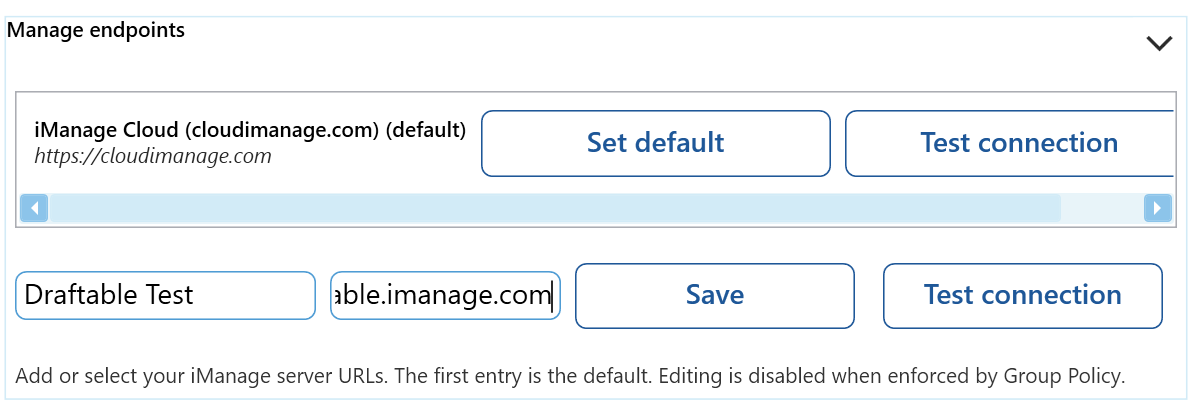 Click the **Save** button. It will now add that endpoint to the endpoint section.
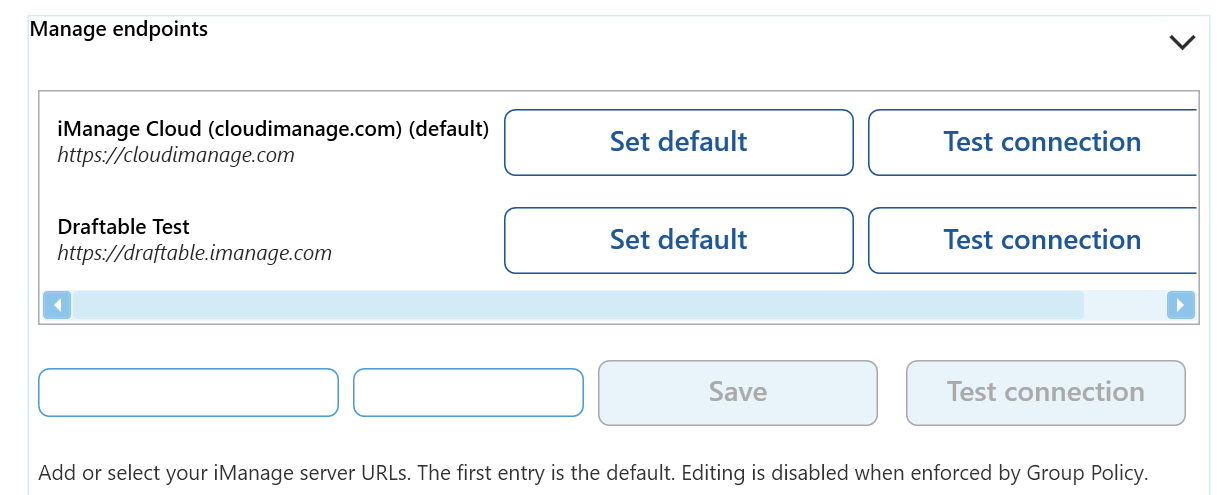 In the environment dropdown section, select the endpoint you want to connect to and click **Connect**.
 Connection is validated when the "Logout" button appears and the dropdown icon greys out.
 That concludes the iManage configuration process between Draftable Legal and cloud iManage.
### iManage integration configuration via group policy
You can also configure the integration configuration step shown at the start of the guide above via group policy for convenience to deploy across multiple user accounts.
Depending on what version of Draftable you are using, there are two different procedures you need to follow depending on the version.
### If you are using Draftable v25.9.300 or earlier:
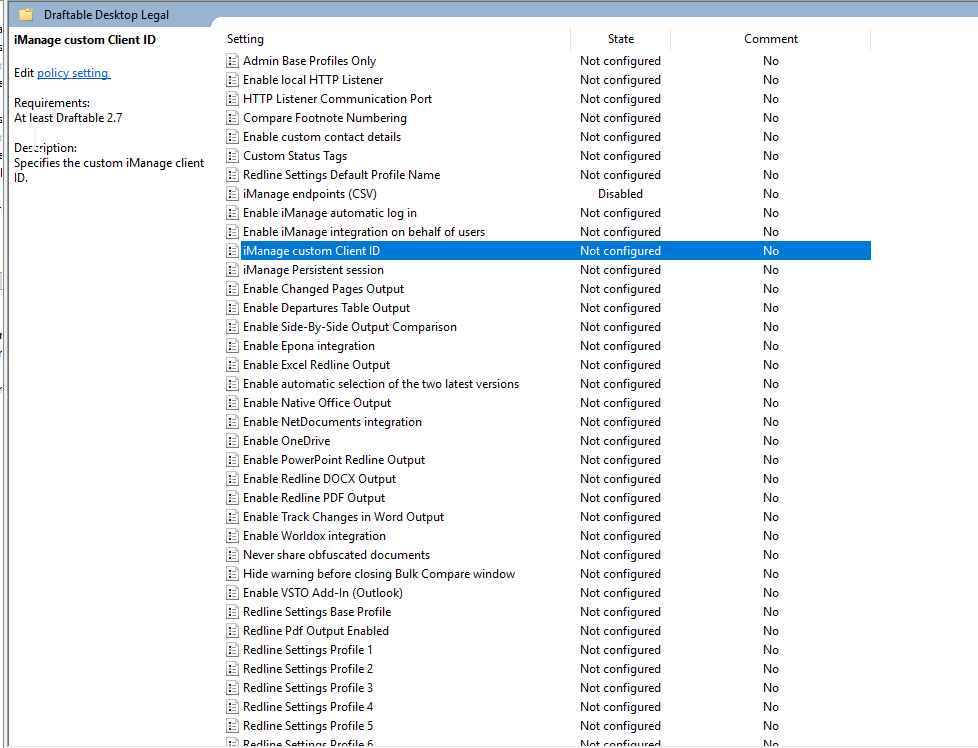
The three configurable fields for iManage cloud integration with Draftable are the, **Enable iManage integration on Behalf of users,** **Service URL** and **Draftable App ID (or Client ID).**
The On Premise GPO options will also work for cloud as long as the service URL is entered the same as the cloud URL.
You can configure this via group policy and follow the steps shown in [this article.](/hc/en-us/articles/18763487262105-Configuring-settings-with-Group-Policy-Draftable-Legal) The image below shows what these group policy settings are.
That concludes the iManage configuration process between Draftable Legal and cloud iManage.
### iManage integration configuration via group policy
You can also configure the integration configuration step shown at the start of the guide above via group policy for convenience to deploy across multiple user accounts.
Depending on what version of Draftable you are using, there are two different procedures you need to follow depending on the version.
### If you are using Draftable v25.9.300 or earlier:
The three configurable fields for iManage cloud integration with Draftable are the, **Enable iManage integration on Behalf of users,** **Service URL** and **Draftable App ID (or Client ID).**
The On Premise GPO options will also work for cloud as long as the service URL is entered the same as the cloud URL.
You can configure this via group policy and follow the steps shown in [this article.](/hc/en-us/articles/18763487262105-Configuring-settings-with-Group-Policy-Draftable-Legal) The image below shows what these group policy settings are.
 ### If you are using Draftable v25.10.000 or later
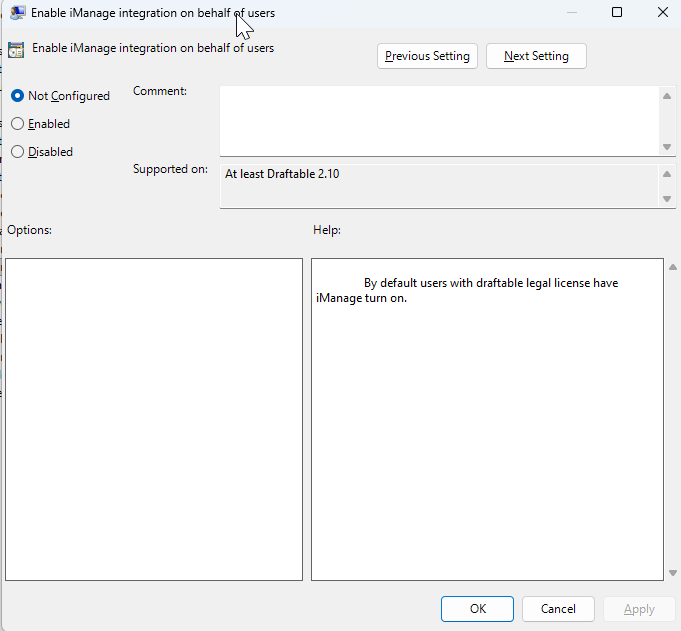
The two configurable fields for iManage cloud integration with Draftable are the, **Enable iManage integration on Behalf of users,** and **iManage endpoints (CSV).**
The first **Enable iManage integration on Behalf of users,** is just a Binary field that enables the integration for users.
### If you are using Draftable v25.10.000 or later
The two configurable fields for iManage cloud integration with Draftable are the, **Enable iManage integration on Behalf of users,** and **iManage endpoints (CSV).**
The first **Enable iManage integration on Behalf of users,** is just a Binary field that enables the integration for users.
 The other policy that needs configuring is **iManage endpoints (CSV).**
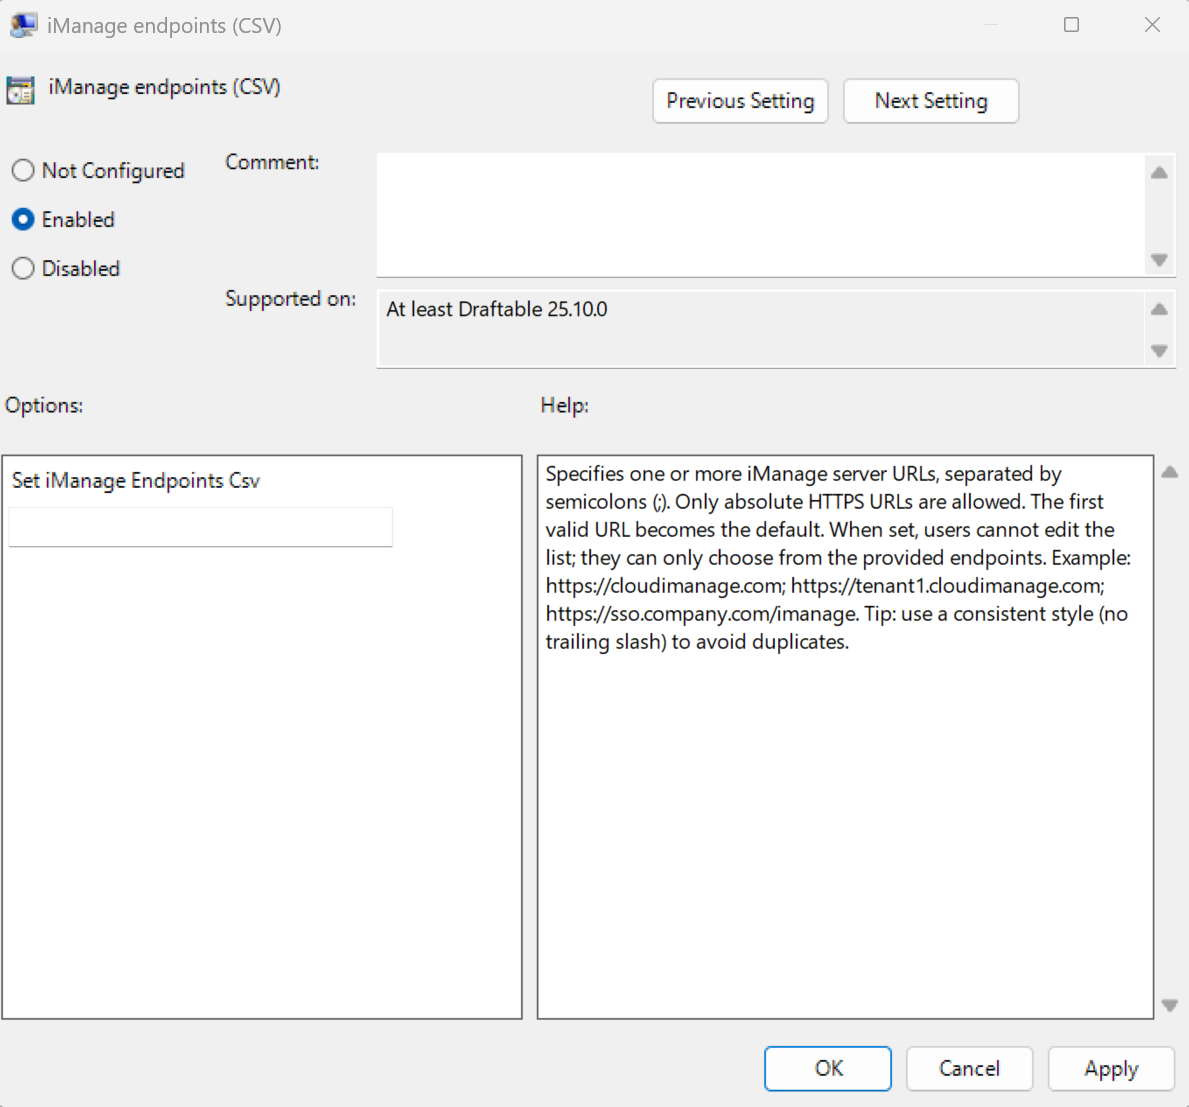 To configure this field, ensure you provide valid URLs, separated by a ";" and a space. For example:
```bash theme={null}
https://draftable.com; https://newcompany.com; https://test_domain.com
```
If you need to configure just for normal iManage cloud (and not on-premises), just ensure you enter:
```bash theme={null}
https://cloudimanage.com
```
**Note:** The first URL provided will be the default one that is selected by Draftable.
## Having issues with integration?
Please get in touch with our support team at \[[support@draftable.com](mailto:support@draftable.com)] please include all information regarding your configuration including screenshots and logs from Draftable in your reply.
To configure this field, ensure you provide valid URLs, separated by a ";" and a space. For example:
```bash theme={null}
https://draftable.com; https://newcompany.com; https://test_domain.com
```
If you need to configure just for normal iManage cloud (and not on-premises), just ensure you enter:
```bash theme={null}
https://cloudimanage.com
```
**Note:** The first URL provided will be the default one that is selected by Draftable.
## Having issues with integration?
Please get in touch with our support team at \[[support@draftable.com](mailto:support@draftable.com)] please include all information regarding your configuration including screenshots and logs from Draftable in your reply.