> ## Documentation Index
> Fetch the complete documentation index at: https://help.draftable.com/llms.txt
> Use this file to discover all available pages before exploring further.
# Using Draftable Redline in Email
> Redline in Email, a new Draftable feature that performs live email redlining for your emails, and also allows you to accept and reject redlined emails. This is all done within Outlook, meaning you never have to leave your inbox.
Once your Microsoft 365 admin has deployed the Draftable Outlook Add-in across your organization using the steps documented in this [article](/hc/en-us/articles/46382047949977-Configuring-Redline-in-Email-Outlook-with-Draftable), you will then have access to this feature in your version of Outlook.
This article will detail how to use this exciting new feature and its capabilities.
**Note:**
Please ensure that Draftable Legal is running and open in the background; otherwise, Redline in Email will not correctly operate in Outlook.
Remote desktop, Citrix, and RDP environments are supported from Redline in Email version 1.1.31.1 onwards.
The screens below reflect the Redline in Email **2.1.0** interface, which introduced a single unified menu for both reading and composing. If your task pane looks different, update the add-in to the latest version.
## Using Draftable Redline in Email
Redline in Email lets you mark up email replies and review changes without leaving Outlook. From version 2.1.0, everything is driven from one **"I want to…"** menu that adapts to what you are doing: **Compose** actions when you are writing a reply, and **Read** actions when you are reviewing a received email.
### Opening Redline in Email
To review a received email, open it. To redline your own reply, open the email and select **Reply** (or **Reply All**) so you have a draft to work in.
On the Outlook ribbon, open **Apps** (the apps launcher) and select **Redline in Email**. The Draftable task pane opens on the right-hand side.
There are also **Compare attachments** and **1-Click Compare** options available through the separate Draftable ribbon. This article covers the Redline in Email task pane.
### The Redline in Email menu
The task pane opens on the **"I want to…"** menu. The actions available depend on whether you are reading or composing, so options that do not apply are greyed out (hover a greyed action to see why).
The **Compose** actions are active — **Redline my changes** ("Show the changes that you have made to the current email.") and **Redline my selection** ("Redline only the selected text in your email."). **Accept or reject changes** is also available.
 The **Read** actions are active — **Compare against an earlier email** ("Compare this email against your previously sent email in the chain.") and **Accept or reject changes**.
 **Accept or reject changes** is the one action available in **both** modes. The other three are mode-specific. The menu also has **Settings** and **How to use Redline in Email** (quick help).
## Compose: redline your reply
### Redline my changes
Make your edits in the reply, then choose **Redline my changes**. Draftable compares your draft (including the conversation history below your reply) against the baseline email and shows a redline of your changes — deletions struck through, insertions underlined. The totals for **changes**, **insertions**, and **deletions** appear beneath the preview, and the **Synced with email** badge means the preview updates automatically as you keep editing.
**Accept or reject changes** is the one action available in **both** modes. The other three are mode-specific. The menu also has **Settings** and **How to use Redline in Email** (quick help).
## Compose: redline your reply
### Redline my changes
Make your edits in the reply, then choose **Redline my changes**. Draftable compares your draft (including the conversation history below your reply) against the baseline email and shows a redline of your changes — deletions struck through, insertions underlined. The totals for **changes**, **insertions**, and **deletions** appear beneath the preview, and the **Synced with email** badge means the preview updates automatically as you keep editing.
 Select **Apply to Email** to write the redline into your reply. Once applied, the change appears as markup in the email body and the badge changes to **Not synced** — the email now contains the redline, so the preview no longer tracks further edits. (To copy the redline instead of applying it, use **Copy**; see [Copy, Apply, and Create New Email](#copy-apply-and-create-new-email).)
 Applying is a one-time action per preview. If you keep editing after applying, run **Redline my changes** again to get a fresh, synced preview.
### Redline my selection
If you only want to redline part of the email rather than the whole reply, use **Redline my selection**.
Highlight the text you want to redline in the email body first, then choose **Redline my selection**. The preview shows a redline of just that selection. (If you run it without selecting anything, the pane prompts you: "No content selected. Please select text before running Redline.")
Applying is a one-time action per preview. If you keep editing after applying, run **Redline my changes** again to get a fresh, synced preview.
### Redline my selection
If you only want to redline part of the email rather than the whole reply, use **Redline my selection**.
Highlight the text you want to redline in the email body first, then choose **Redline my selection**. The preview shows a redline of just that selection. (If you run it without selecting anything, the pane prompts you: "No content selected. Please select text before running Redline.")
 Select **Show surrounding context** (the eye button beneath the preview) to see the selection within the wider email, with the surrounding text greyed out. Select **Hide surrounding context** to return to just the selection.
 ## Read: review a received email
### Compare against an earlier email
Open the received email and select **Compare against an earlier email**. Draftable compares it against the previous version in the conversation (including the conversation history) and marks every difference, with the totals shown beneath the preview.
## Read: review a received email
### Compare against an earlier email
Open the received email and select **Compare against an earlier email**. Draftable compares it against the previous version in the conversation (including the conversation history) and marks every difference, with the totals shown beneath the preview.
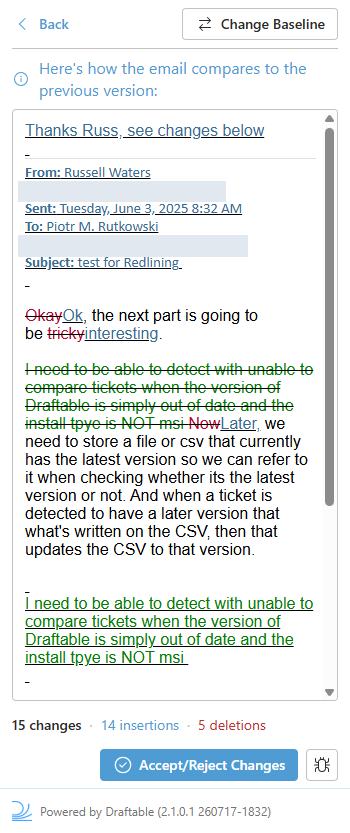 Select **Change Baseline** ("Change the older email being compared against.") to compare against a different earlier email. Choose the email you want, then select **Select This Email**.
 When you are ready to work through the changes, select **Accept/Reject Changes**.
### Accept or reject changes
Use **Accept or reject changes** to work through the changes in a redlined email. Select a change in the preview, then use the toolbar to accept or reject it. A counter tracks your progress — the current change, how many you have **accepted** and **rejected**, and how many **remain**.
When you are ready to work through the changes, select **Accept/Reject Changes**.
### Accept or reject changes
Use **Accept or reject changes** to work through the changes in a redlined email. Select a change in the preview, then use the toolbar to accept or reject it. A counter tracks your progress — the current change, how many you have **accepted** and **rejected**, and how many **remain**.
 #### What each toolbar button does
The toolbar runs left to right. Hovering any button in Outlook shows the same tooltip listed here.
| Button | Tooltip | What it does |
| ------------------- | ------------------------ | ----------------------------------------------------- |
| **‹** Back | Return to menu | Returns to the "I want to…" menu |
| **⌃** Up chevron | Go to previous change | Selects the previous change |
| **⌄** Down chevron | Go to next change | Selects the next change |
| **✓** Single tick | Accept selected revision | Accepts the currently selected change |
| **✓✓** Double tick | Accept all revisions | Accepts **every** remaining change at once |
| **✕** Single cross | Reject selected revision | Rejects the currently selected change |
| **✕✕** Double cross | Reject all revisions | Rejects **every** remaining change at once |
| **↶** Undo | undo (ctrl + z) | Reverses your last accept or reject (also **Ctrl+Z**) |
**Undo** is greyed out until you accept or reject at least one change, then it becomes available. As you accept or reject, the counter updates and the selection advances to the next change automatically.
#### What each toolbar button does
The toolbar runs left to right. Hovering any button in Outlook shows the same tooltip listed here.
| Button | Tooltip | What it does |
| ------------------- | ------------------------ | ----------------------------------------------------- |
| **‹** Back | Return to menu | Returns to the "I want to…" menu |
| **⌃** Up chevron | Go to previous change | Selects the previous change |
| **⌄** Down chevron | Go to next change | Selects the next change |
| **✓** Single tick | Accept selected revision | Accepts the currently selected change |
| **✓✓** Double tick | Accept all revisions | Accepts **every** remaining change at once |
| **✕** Single cross | Reject selected revision | Rejects the currently selected change |
| **✕✕** Double cross | Reject all revisions | Rejects **every** remaining change at once |
| **↶** Undo | undo (ctrl + z) | Reverses your last accept or reject (also **Ctrl+Z**) |
**Undo** is greyed out until you accept or reject at least one change, then it becomes available. As you accept or reject, the counter updates and the selection advances to the next change automatically.
 If you accidentally accept or reject a change, press **Ctrl+Z** (or the Undo button) to reverse it.
### Copy, Apply, and Create New Email
Depending on the screen and whether you are composing or reading, the preview offers these actions:
* **Copy** — copies the preview to your clipboard so you can paste it into an email. If you have selected text *within the preview*, Copy copies only that selection (the button reads **Copy selection**). After copying, Draftable reminds you to paste using **Keep Source Formatting** so the markup is preserved.
* **Apply to Email** (compose) — writes the finished redline into your reply.
* **Create New Email** (read) — opens a new email containing your accepted and rejected changes.
## Settings: include images in comparisons
Open **Settings** from the menu to control whether images are compared. **Compare images** is off by default; turning it on includes image changes in the redline, but "This can slow compares, especially in large emails."
If you accidentally accept or reject a change, press **Ctrl+Z** (or the Undo button) to reverse it.
### Copy, Apply, and Create New Email
Depending on the screen and whether you are composing or reading, the preview offers these actions:
* **Copy** — copies the preview to your clipboard so you can paste it into an email. If you have selected text *within the preview*, Copy copies only that selection (the button reads **Copy selection**). After copying, Draftable reminds you to paste using **Keep Source Formatting** so the markup is preserved.
* **Apply to Email** (compose) — writes the finished redline into your reply.
* **Create New Email** (read) — opens a new email containing your accepted and rejected changes.
## Settings: include images in comparisons
Open **Settings** from the menu to control whether images are compared. **Compare images** is off by default; turning it on includes image changes in the redline, but "This can slow compares, especially in large emails."
 ## Quick help
For a reminder of what each action does, select **How to use Redline in Email** from the menu. It explains each workflow and includes a **Good to know** section:
* **Change Baseline** — the baseline is the earlier email (including its conversation history) used to compare with your current email. Use Change Baseline to choose another earlier email in the conversation.
* **Synced with email** — edits to your email body automatically update the redline preview. Reverting a change in the preview stops syncing, so your preview edits are not overwritten.
* **Revert a change** — select a marked change in the preview and choose Revert to leave it out of the redline applied to your email. This changes the preview, not your draft.
## Quick help
For a reminder of what each action does, select **How to use Redline in Email** from the menu. It explains each workflow and includes a **Good to know** section:
* **Change Baseline** — the baseline is the earlier email (including its conversation history) used to compare with your current email. Use Change Baseline to choose another earlier email in the conversation.
* **Synced with email** — edits to your email body automatically update the redline preview. Reverting a change in the preview stops syncing, so your preview edits are not overwritten.
* **Revert a change** — select a marked change in the preview and choose Revert to leave it out of the redline applied to your email. This changes the preview, not your draft.
 **Redline in Email not working for a text change?** If the panel will not load, you hit a message size limit, or the redline will not apply to your reply, you can build the redline manually in Draftable Legal and paste it into your email. See [Redline in Email workaround: create a text redline in Draftable Legal](/hc/en-us/articles/Redline-in-Email-text-redline-workaround).
That's how we can use Draftable Redline in email. If you have any questions or issues, please get in touch with the support team at [support@draftable.com](mailto:support@draftable.com)
**Redline in Email not working for a text change?** If the panel will not load, you hit a message size limit, or the redline will not apply to your reply, you can build the redline manually in Draftable Legal and paste it into your email. See [Redline in Email workaround: create a text redline in Draftable Legal](/hc/en-us/articles/Redline-in-Email-text-redline-workaround).
That's how we can use Draftable Redline in email. If you have any questions or issues, please get in touch with the support team at [support@draftable.com](mailto:support@draftable.com)