> ## Documentation Index
> Fetch the complete documentation index at: https://help.draftable.com/llms.txt
> Use this file to discover all available pages before exploring further.
# AWS copilot deployment guide for Draftable Self-hosted
> AWS Copilot is designed for both existing ECS users, and new ECS users who want to move beyond manual management of lower-level infrastructure, and instead just start thinking about their application and its lifecycle. In essence users can go from idea to implementation quickly, with the confidence that the infrastructure you have deployed has production-ready configuration. This article aims to produce a guide on how to do this specifically for Draftable Self-hosted containers.
**This documentation is for API Self-Hosted Version 2 (Legacy)**
Version 2 is a legacy deployment model. All new customers **must** use Version 3, which features a modern multi-container architecture with improved security and performance.
👉 [Get started with API Self-Hosted v3](/hc/en-us/articles/51133475373465-API-Self-Hosted-v3-Quick-Start-Guide)
**Note:** Currently there is no native method of persistent storage instances using AWS copilot. This means that if you stop your instance, you will lose all your data, configuration and comparisons for your Self-hosted appliance. If this is an issue, we suggest deploying [Self-hosted instances using ECS](/hc/en-us/articles/6142662952089-API-Self-hosted-AWS-EC2-deployment-guide) using a non-copilot method which will provide your instance with persistent storage.
## Deployment guide
This deployment guide is broken up into multiple sections as there are many prerequisite configurations required before you can successfully launch a EC2 instance via AWS copilot. If you have never deployed a AWS EC2 instance with this method, please follow along carefully as deployment may not be successful if all steps are not followed.
### Installing AWS CLI
Depending on whether you are using a Windows or Linux based environment, you will need to configure and setup the AWS CLI on your terminal to be able to use AWS copilot. Please refer to [Amazon documentation](https://docs.aws.amazon.com/cli/latest/userguide/getting-started-install.html) regarding this step and verify that the CLI is installed by using the following command.
```bash theme={null}
aws help
```
If the CLI is correctly installed, you should see text explaining what AWS CLI is.
### AWS user authentication and docker
Now you need to log into your AWS account via the CLI, however before doing this you will need to ensure that the account being used has the following permissions set:
* **AdministratorAccess**
This can be configured in your user settings on your AWS console. If your account does not have this permission applied, you will not be successful in launching a container using AWS copilot. Once that has been verified log into your CLI using the following command and enter the relevant data.
```bash theme={null}
aws configure
```
 Once you have successfully logged in, you will need to ensure that you have installed docker on your machine (which will differ based on your environment) so that copilot can build and upload the images when launching the container.
### Setup location and installing copilot
Choose a location on your machine where you will host you copilot content, which will include the copilot executable and your instance files such as manifest and Dockerfile. Once you have setup that directory, you will point your terminal to that directory and install copilot.
Below is a command examples depending on your operating system environment. Please ensure you **edit these commands** to correctly set the installation location for copilot.
#### **Linux**
For Linux x86 (64-bit) systems:
```bash theme={null}
sudo curl -Lo /usr/local/bin/copilot https://github.com/aws/copilot-cli/releases/latest/download/copilot-linux \
&& sudo chmod +x /usr/local/bin/copilot \
&& copilot --help
```
For Linux ARM systems:
```bash theme={null}
sudo curl -Lo /usr/local/bin/copilot https://github.com/aws/copilot-cli/releases/latest/download/copilot-linux-arm64 \
&& sudo chmod +x /usr/local/bin/copilot \
&& copilot --help
```
#### **Windows**
Using Powershell or similar, run the following command:
```bash theme={null}
PS C:\> New-Item -Path 'C:\copilot' -ItemType directory; `
Invoke-WebRequest -OutFile 'C:\copilot\copilot.exe' https://github.com/aws/copilot-cli/releases/latest/download/copilot-windows.exe
```
#### **macOS**
For macOS:
```bash theme={null}
sudo curl -Lo /usr/local/bin/copilot https://github.com/aws/copilot-cli/releases/latest/download/copilot-darwin \
&& sudo chmod +x /usr/local/bin/copilot \
&& copilot --help
```
You can verify that copilot has been installed on your machine by using the following command:
```bash theme={null}
copilot help
```
The help command should correctly execute.
### Configuring your Docker file and final checks
A *Dockerfile* is a text document that contains all the commands a user could call on the command line to assemble an image. A Dockerfile is required for copilot as it reads this file to know where to pull the image from. Hence you can build a Dockerfile with a single line of text below.
```dockerfile theme={null}
FROM draftable/apish:latest
```
Ensure you save this file in the root directory of where you setup copilot.
### Using Copilot to launch your instance
Now we can start to use copilot and build our Self-hosted instance. Start with the command:
```bash theme={null}
copilot init
```
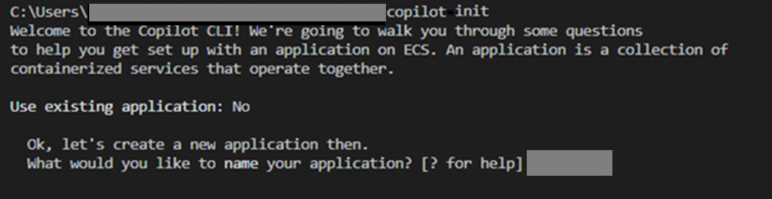
You will be prompted to enter information regarding the instance. First you will be prompted to give your application a name:
Once you have successfully logged in, you will need to ensure that you have installed docker on your machine (which will differ based on your environment) so that copilot can build and upload the images when launching the container.
### Setup location and installing copilot
Choose a location on your machine where you will host you copilot content, which will include the copilot executable and your instance files such as manifest and Dockerfile. Once you have setup that directory, you will point your terminal to that directory and install copilot.
Below is a command examples depending on your operating system environment. Please ensure you **edit these commands** to correctly set the installation location for copilot.
#### **Linux**
For Linux x86 (64-bit) systems:
```bash theme={null}
sudo curl -Lo /usr/local/bin/copilot https://github.com/aws/copilot-cli/releases/latest/download/copilot-linux \
&& sudo chmod +x /usr/local/bin/copilot \
&& copilot --help
```
For Linux ARM systems:
```bash theme={null}
sudo curl -Lo /usr/local/bin/copilot https://github.com/aws/copilot-cli/releases/latest/download/copilot-linux-arm64 \
&& sudo chmod +x /usr/local/bin/copilot \
&& copilot --help
```
#### **Windows**
Using Powershell or similar, run the following command:
```bash theme={null}
PS C:\> New-Item -Path 'C:\copilot' -ItemType directory; `
Invoke-WebRequest -OutFile 'C:\copilot\copilot.exe' https://github.com/aws/copilot-cli/releases/latest/download/copilot-windows.exe
```
#### **macOS**
For macOS:
```bash theme={null}
sudo curl -Lo /usr/local/bin/copilot https://github.com/aws/copilot-cli/releases/latest/download/copilot-darwin \
&& sudo chmod +x /usr/local/bin/copilot \
&& copilot --help
```
You can verify that copilot has been installed on your machine by using the following command:
```bash theme={null}
copilot help
```
The help command should correctly execute.
### Configuring your Docker file and final checks
A *Dockerfile* is a text document that contains all the commands a user could call on the command line to assemble an image. A Dockerfile is required for copilot as it reads this file to know where to pull the image from. Hence you can build a Dockerfile with a single line of text below.
```dockerfile theme={null}
FROM draftable/apish:latest
```
Ensure you save this file in the root directory of where you setup copilot.
### Using Copilot to launch your instance
Now we can start to use copilot and build our Self-hosted instance. Start with the command:
```bash theme={null}
copilot init
```
You will be prompted to enter information regarding the instance. First you will be prompted to give your application a name:
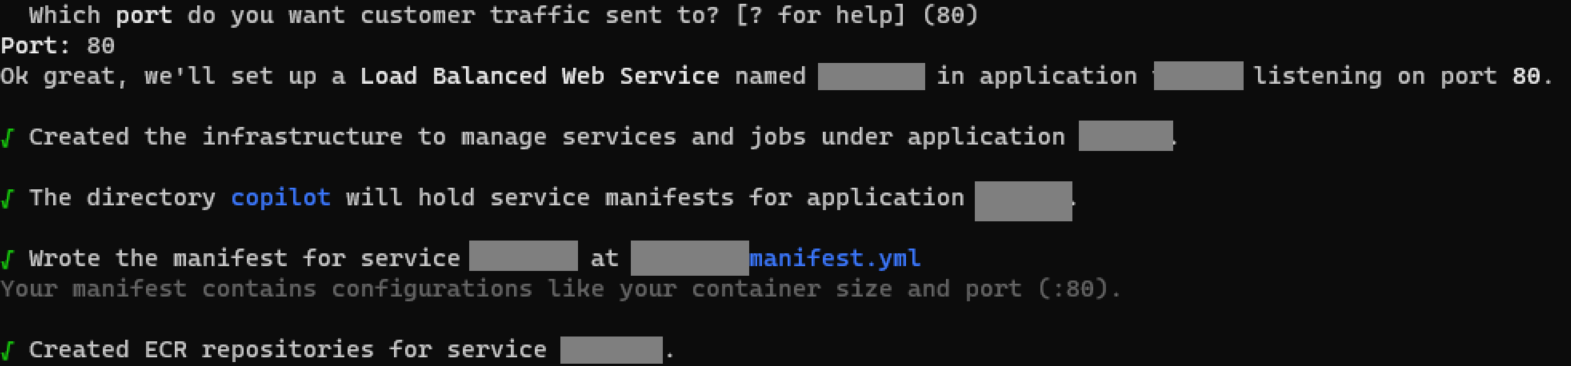
 Then you will select the workload type which will suit your application. For this we need to select a **load balanced web service**.
 Provide a name for the load balanced webservice.
 Provide a name for the service.
 Assuming you correctly placed the Dockerfile in the root directory where the copilot executable is located, you simply need to select the first option when copilot prompts you to select the Dockerfile.
 Lastly you will be prompted to select which port traffic will be sent to on your instance. Once entered copilot will begin local infrastructure configuration.
 Now that the local infrastructure has been built in this local directory, we now need to edit the manifest file, which is the file that is used to configure Draftable Self-hosted instance.
This file is created for you and is located under a folder which is named after the service. Go to this directory and edit this file.
This configuration is critical so please take note of the example manifest file below. Attached to this article is also a copy of this example manifest YAML file.
```yaml expandable theme={null}
name: selfhosted
type: Load Balanced Web Service
http:
path: '/'
healthcheck:
success_codes: '200,301,302'
grace_period: 120s
image:
build: Dockerfile
port: 80
cpu: 2048
memory: 4096
platform: linux/x86_64
count: 1
exec: true
storage:
ephemeral: 20
volumes:
draftable:
# efs: true
path: /srv/draftable
read_only: false
cgroup:
path: /sys/fs/cgroup
read_only: false
variables:
DRAFTABLE_APISH_NGINX: |-
nginx:
virtual_hosts:
draftable:
conf_settings:
http_redirects_to_https: False
use_x_forwarded_proto: True
environments:
dev:
count:
range:
min: 1
max: 3
spot_from: 2
cpu_percentage: 90
memory_percentage: 90
production:
count:
range:
min: 2
max: 10
cpu_percentage: 70
memory_percentage: 80
FROM draftable/apish:latest
```
The above example will provide a working instance, however if you may need to configure it specifically to suit your instance.
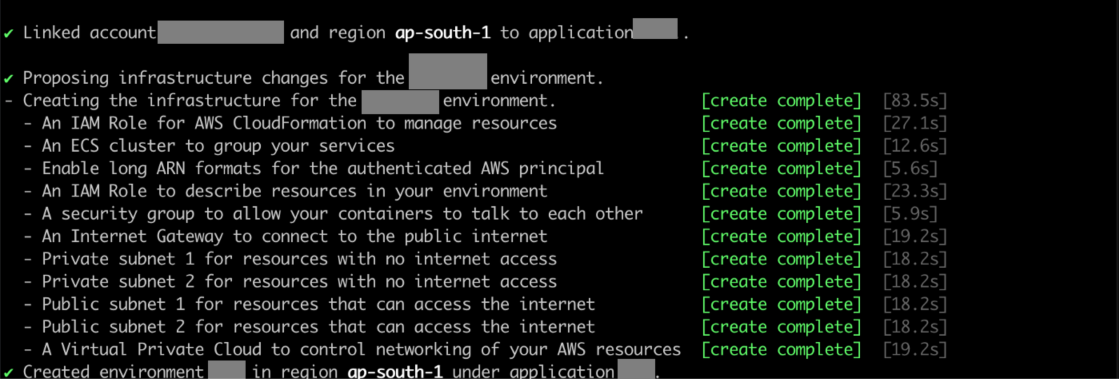
Once all files are been correctly configured you can go ahead and deploy the environment.
Now that the local infrastructure has been built in this local directory, we now need to edit the manifest file, which is the file that is used to configure Draftable Self-hosted instance.
This file is created for you and is located under a folder which is named after the service. Go to this directory and edit this file.
This configuration is critical so please take note of the example manifest file below. Attached to this article is also a copy of this example manifest YAML file.
```yaml expandable theme={null}
name: selfhosted
type: Load Balanced Web Service
http:
path: '/'
healthcheck:
success_codes: '200,301,302'
grace_period: 120s
image:
build: Dockerfile
port: 80
cpu: 2048
memory: 4096
platform: linux/x86_64
count: 1
exec: true
storage:
ephemeral: 20
volumes:
draftable:
# efs: true
path: /srv/draftable
read_only: false
cgroup:
path: /sys/fs/cgroup
read_only: false
variables:
DRAFTABLE_APISH_NGINX: |-
nginx:
virtual_hosts:
draftable:
conf_settings:
http_redirects_to_https: False
use_x_forwarded_proto: True
environments:
dev:
count:
range:
min: 1
max: 3
spot_from: 2
cpu_percentage: 90
memory_percentage: 90
production:
count:
range:
min: 2
max: 10
cpu_percentage: 70
memory_percentage: 80
FROM draftable/apish:latest
```
The above example will provide a working instance, however if you may need to configure it specifically to suit your instance.
Once all files are been correctly configured you can go ahead and deploy the environment.
 Copilot will begin to launch all the infrastructure required for this instance. This may take some time depending on your machine and internet connection speed.
 ### Finalising and connecting to your new instance
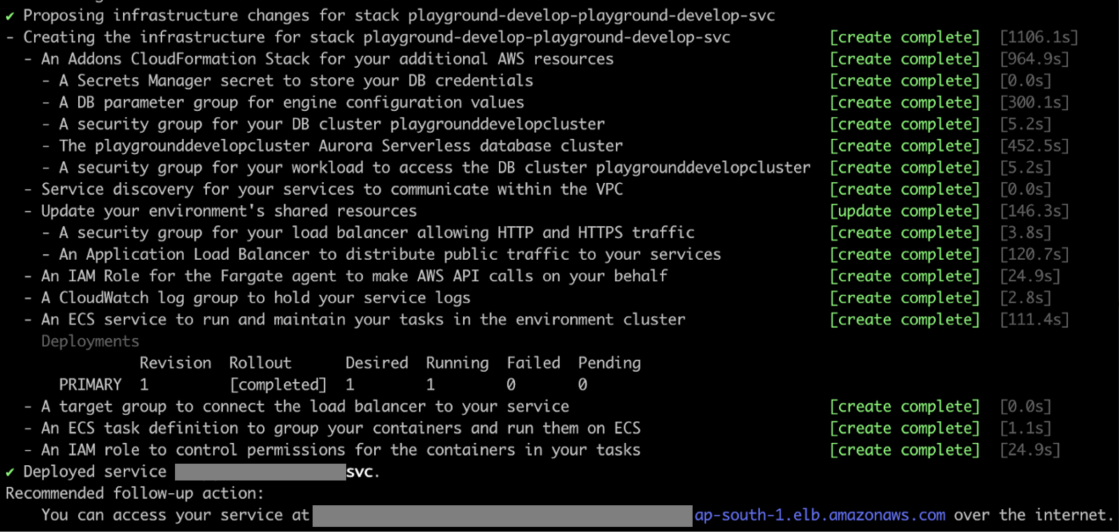 If configuration has been done correctly you should have a successfully launched an instance via copilot to ECS. You can access the instance by directly connecting to it via the link provided at the end of the setup.
You can make changes to this instance by logging into your AWS console and editing the components directly.
If configuration has been done correctly you should have a successfully launched an instance via copilot to ECS. You can access the instance by directly connecting to it via the link provided at the end of the setup.
You can make changes to this instance by logging into your AWS console and editing the components directly.